Required Tools:
-
Utility blade
-
Scissors
Optional Supplies:
-
Needle Nose Pliers
-
Cleaning Supplies
Step 1: Cut Elastic Band
Use the utility blade to carefully cut the elastic band on each side of the door netting. To cut as close to the trim as possible, keep tension on the band by pulling it away from the side that you are cutting.

Step 2: Trim Netting
As before, pull the netting away from the side you are cutting to create tension.

Step 3: Remove Residual Netting from Trim Channel (optional)
Pull out any remaining pieces of the net that are visible. The optional use of needle nose pliers can assist here. Otherwise, you may use your hands. Don’t worry about removing everything; the pocket will hide the remnants of the original net.

Step 4: Clean Door Panel (optional)
While access is easier, this is a great time to clean the door trim! Once the pocket is installed, it will be much more difficult to clean that portion of the door panel.
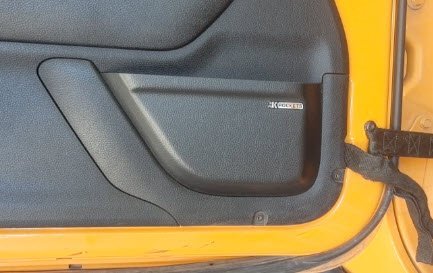
Step 5: Insert the JK Pocket into the Door Trim
Beginning with the rear side of the door, insert the tabs into the door trim, finishing with the upper, front tab. You may have to gently bend the pocket to insert the last one or two tabs into the door.


Comments are closed